Friday, March 5, 2010

Get Rich Affiliate Web Layout

0 comments
In my first tutorial, I will show you how to create an affiliate-scam looking website. There's tons of them across the internet so it could be a useful skill to have. Let me know what you think.

Final Result:


Step 1 - Background
First let's start the tutorial by opening up a new PSD, 1024x768. Its under the Web presets in CS4. make a new layer and make a pattern overlay using this pattern.


Once you've overlayed the pattern, add a layer mask then take a black to white gradient and drag it from bottom allllll the way to the TOP. Bottom to TOP, then you should get an effect like this.


Step 2 - Content Area
Now that we've got the background finished, lets used a white rounded rectangle with a radius of 30 as our content area. Then add these layer styles to give it a cool border.


The effect:


Step 3 - Background of Header
Ok so we've got our content area. Now let's get our header goin. What sort of things do people associate with making tons of money? Living on the beach, makin money, happiness, fancy cars, and much more. So let's incorporate those into our header. Subconciously that plays a role in how people perceive the website. So take a beach photo offline, i found this one on google


After I resized the image, i stretched it out so it would fit across the top like so.


Once you've got something similar to above, then Ctrl+Click the content area layer, then press Ctrl+Shift+I to invert the selection to anything outside of the content area. Ctrl+X to delete it, then add this drop shadow.


Result:


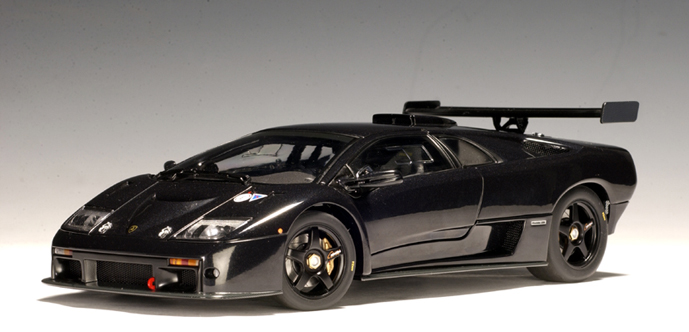
Step 4 - Adding Props to Header
Ok, so we've got a cool beach seen goin, but we need to add some props to make this pop a lil more. So i found an image of a businessman, some falling money, and a Lambo to use. Let's start with the dude and some money.

BTW, these are not my images, so don't use them for commercial purposes. Use your magic wand tool and edit out the background of all 3 images then resize to fit the header. I put my guy on the left with some money behind him, then transformed the money a lil bit and put some on the right where my car will be. Then i laid the car on top on the right.


Step 5 - Header Text
Ok so let's finish up that header with out captivating title "Work from Home, Make Millions"
I chose Impact font because I seem to see that everywhere. Then i added these effects to make it pop. *** Same drop shadow as above, didn't want to waste space.


And my result:


Final Step - Add Static Text and Title
One of the most important things of a web layout like this, is the first words under the header. Normally its in large text and includes a call to action, like BUY! LEARN! GET! STOP! START!
So i chose the little paragraph :
Learn How Ian Golden can teach you to make
MASSIVE affiliate commission from the
comfort of Your HOME!

After that just fill in the text with whatever you want, and after i added my signature (it really is mine), it turned out pretty good.


Hope you enjoyed the tutorial, let me know what needs work. Thanks
Ian.

Thursday, February 25, 2010

Drum Set Textures

1 comments
Alright everyone, the last texture i have for ya is form my drumset. Besides for the drums themselves i discovered some very cool drumset textures. The cymbals have a cool grain to them as well as some cool movement. Then the top of my cowbell is a dark grainy texture. When i went to look at my old snare drum, i saw how beat up with top of it was and its PERFECT for some grunge texture or brushes. Check em out and let me know if you create! I'll link ya

Drumset Texture 1
Drumset Texture 2
Drumset Texture 3
Drumset Texture 4
Drumset Texture 5
Drumset Texture 6

Hopefully i'll get a tutorial up using some of these texture sets. Have a great day!

ig.

Dark Leather Texture Pack

0 comments
Alright, I found a bunch of dark leather around the house too. So let me know if anyone can use these textures to their benefit. I had a lot of trouble with lighting on these ones, as well as staying focused. So to be real, these aren't the most high quality but take em or leave em.


Dark Leather Texture 1
Dark Leather Texture 2
Dark Leather Texture 3
Dark Leather Texture 4


After taking a closer look, i do like the grainy texture of these. I think they'll be real versatile for a grunge background or something of the sort. It'd be easy to overlay them with a darker color and have a cool effect. AGAIN>>> if anyone does something cool with these let me know and i'll put a link up

Wall Textures

0 comments
Well, i'll be honest. I've got like 4 different types of walls in my house. I really thought this would've been a larger set but as I went from room to room, i realized all of them were either smooth wall paper or spackled walls. Soo.. i came up with this 5 texture set of wall textures.


Wall Texture 1
Wall Texture 2
Wall Texture 3
Wall Texture 4
Wall Texture 5

Rough Wood Textures

0 comments

After taking all those smooth wood texture pics, i came across a couple logs of wood and figured i'd snap some photos of rough wood textures as well. These may be a little out of focus but they're yours for the takin'. If anyone comes up with anything from these make sure you let me know and i'll link to your art. Here's the Rough wood textures.

Rough Wood Texture 1
Rough Wood Texture 2
Rough Wood Texture 3
(yeah this one is a lil dark but I thought it was a cool effect)
Rough Wood Texture 4

Basket Texture Pack

0 comments
Alright it's time for a basket texture set. My house is adorned with wicker accents everywhere it seems, so the idea of a basket/wicker texture pack seemed like a good idea to me. After taking 20 or so pictures though, you come to realize all wicker and baskets pretty much look the same. But heres some pics for everyone. Again, comment and let me know what i need to fix.


Basket/Wicker Texture 1
Basket/Wicker Texture 2
Basket/Wicker Texture 3
Basket/Wicker Texture 4
Basket/Wicker Texture 5

I personally think that this last one will be the most useful one of all, due to the quality of the picture. I've never really been a photographer so i'm still learning. But if you find any uses for these sets let me know and i'll be glad to show off your work on here!

Peace, IG.


Smooth Wood Textures

0 comments

Well everyone i started working on my first textures sets. It was actually a pretty fun process. As i explored around my house with a camera i realized how many textures there are everywhere. Walls, tables, carpets, place mats, and even toilet seats are all different textures that could be useable in photoshop. My first sets may be a little iffy, and I'm sure some of them are out of focus so feel free to let me know if any of them need work. I can't .zip the sets all together so I'm just going to upload them as individual images. Here ya go, there's 10 images of smooth wood textures in my home. The lighting could use some work, but bear with me its the first set.


Smooth Wood Texture 1
Smooth Wood Texture 2
Smooth Wood Texture 3
Smooth Wood Texture 4
Smooth Wood Texture 5

Smooth Wood Texture 6
Smooth Wood Texture 7
Smooth Wood Texture 8
Smooth Wood Texture 9
Smooth Wood Texture 10


Leme know if ya like em!
IanGolden
older post